


Views: 222 Author: Otechkabel Publish Time: 2026-04-24 Origin: Site


When customers ask me whether their Starlink cable can be extended, my answer is always the same: *yes, but only if you respect Starlink's power, shielding, and length limits*. Over the past years helping overseas ISPs, integrators, and OEM partners, I've seen both flawless, long‑term extensions and disastrous DIY jobs that killed performance or even damaged equipment. [dishytech]
In this article, I'll explain how Starlink cabling works, what Starlink officially recommends, what I've learned as a cable manufacturer and installer, and step‑by‑step methods to extend your Starlink cable with minimum risk. [starlink]

From a cabling engineer's point of view, a Starlink cable is more than "just a network cable." It combines data transmission and power delivery between the dish (terminal) and the router, and its design is tightly coupled to Starlink's hardware. [spacetek.com]
- The cable sends power from the router or power supply up to the dish using a proprietary PoE‑like implementation. [starlink]
- It carries high‑speed data, so shielding, impedance and twist rates matter for signal integrity. [linketric]
- The factory length is chosen to keep voltage drop and signal attenuation within a safe window in typical installations. [spacetek.com]
This is why Starlink sets a "reasonable length range at the factory" and warns that non‑standard modifications can impact performance or support eligibility. [starlink]
Yes, Starlink cables can be extended, and many users—installers, RV owners, rural households, and businesses—do this successfully in real deployments. However, every extra meter introduces more resistance, voltage drop, and potential interference, so extensions must be designed carefully. [parts4star]
While Starlink's public support material focuses more on approved accessories than DIY modifications, the guidance is clear on two points: [starlink]
- Use Starlink‑approved cables and accessories wherever possible. [starlink]
- Follow the official routing and installation recommendations to avoid damage, moisture, and physical stress. [starlink]
When you go beyond the official ecosystem, you are responsible for maintaining proper shielding, length, and weather protection. [linketric]
In practice, I see four main strategies. Each has its own risk, cost, and skill requirements. [parts4star]
If available in your region and for your Starlink generation, the cleanest option is to use an official or purpose‑built Starlink extension cable of the correct type and connector. [spacetek.com]
- Cable and connectors are designed for proper impedance, shielding, and weather resistance.
- You avoid cutting or modifying the original cable.
- Installation is straightforward: disconnect power, plug in the extension, re‑route, and test. [parts4star]
This approach offers the best balance of safety, performance, and support compatibility. [starlink]
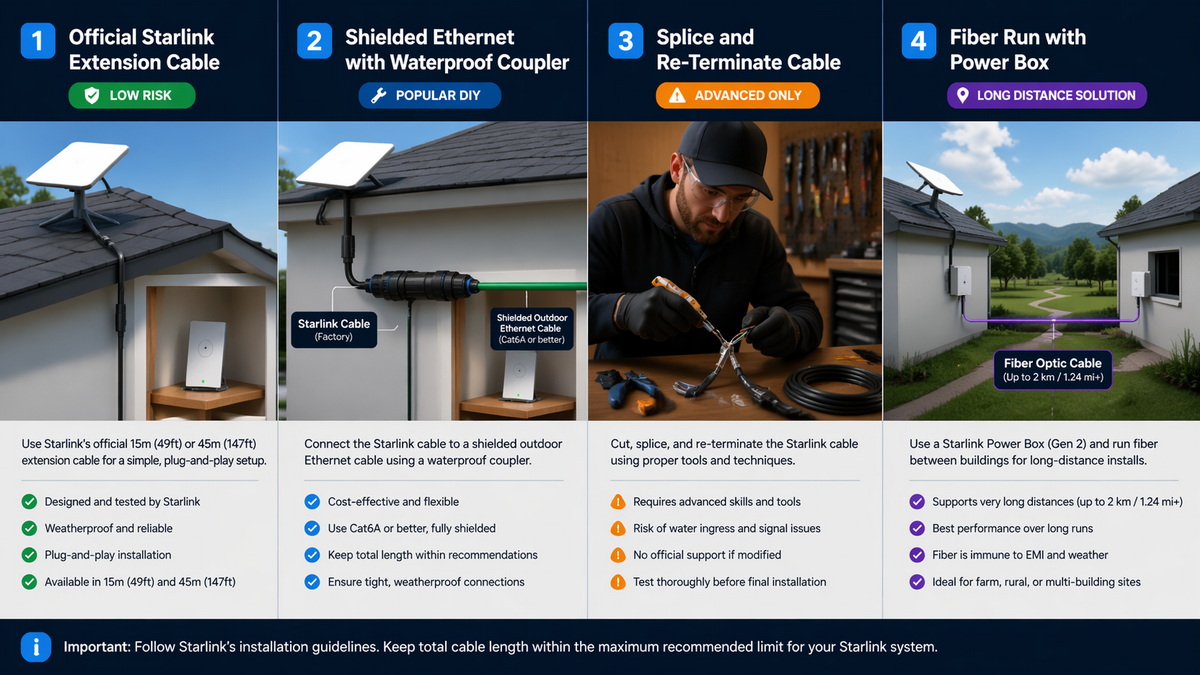
For many installers, the most practical path is to join the Starlink cable to a length of shielded Cat6/Cat6A using a weather‑proof Ethernet coupler. [dishytech]
Key practices I follow in projects:
- Use outdoor‑rated, shielded Cat6 or Cat6A with full copper conductors (no CCA).
- Install a waterproof, shielded coupler (IP67/IP68) for the junction outside. [dishytech]
- Keep total distance between dish and router within roughly 150 ft / 45 m for copper‑based runs, unless you are using a specialized power‑injection or fiber solution. [parts4star]
This method is widely used in rural and commercial deployments because it combines flexibility with solid performance when done correctly. [linketric]
Some advanced users cut and re‑terminate the Starlink cable, or splice it directly to a new length. From a professional standpoint, this is high‑risk and only suitable for people who: [youtube]
- Understand Ethernet pinouts (usually T568B) and Starlink's specific wiring.
- Own high‑quality crimp tools, flush cutters, and testers.
- Can maintain the shielding and drain wire continuity through the new connector. [youtube]
Even small mistakes—poorly trimmed conductors, damaged shield, wrong pair order—can cause intermittent performance or complete failure, especially under harsh weather. [youtube]
When you must reach another building or cover a large estate, standard copper lengths become a bottleneck. In these cases, we often design hybrid solutions: [tiktok]
- Use a power adapter or PoE injector box near the dish, then convert to fiber for long indoor/outdoor runs, and back to Ethernet near the router. [tiktok]
- Or place the Starlink router closer to the dish, and extend your LAN (not the Starlink cable) using fiber or high‑grade Ethernet within your property. [tiktok]
These systems are more complex but allow hundreds of meters of reach while maintaining signal quality and safety. [spacetek.com]
Drawing from both manufacturer testing and real‑world projects, these are the non‑negotiable rules I emphasize to clients. [dishytech]
Every meter you add increases signal loss and voltage drop. To keep your link stable: [linketric]
- Keep total copper cable length conservative, ideally within about 45 m between dish and router for standard copper runs. [parts4star]
- Choose lower‑AWG (thicker) copper conductors to reduce voltage drop. [dtechelectronics]
- Avoid chaining multiple cheap couplers, which add unnecessary impedance and failure points. [dishytech]
If you must exceed typical lengths, consider a power adapter box plus fiber or a redesigned network layout instead of blindly adding more copper. [tiktok]
Extended cables can act as antennas for noise if EMI is not controlled properly. [spacetek.com]
- Use shielded cable and ensure the shield/drain wire is correctly terminated and bonded. [youtube]
- Route Starlink cables away from high‑power lines, motors, or RF transmitters where possible. [linketric]
- Avoid running parallel to AC power cables for long distances; cross them at right angles to minimize coupling. [spacetek.com]
These simple layout decisions can make the difference between a clean, stable link and chronic dropouts. [linketric]
In my experience, most long‑term failures are not "electrical" but environmental. [parts4star]
- Protect all outdoor joints with IP‑rated enclosures, gaskets, or weather boots. [parts4star]
- Use UV‑resistant jackets and avoid tight bends, crushing, or tension along roof edges or through conduits. [dishytech]
- Secure cables with appropriate clips or ties and avoid sharp edges that might gradually cut the sheath. [parts4star]
Done correctly, a Starlink cable extension can survive harsh sun, rain, and temperature swings for years. [linketric]
Cable routing should always respect local electrical and building codes. [linketric]
- Do not route low‑voltage communication cables where they could become tripping hazards or be accidentally cut.
- When using shielded cables, ensure proper grounding to avoid ground loops or induced currents. [spacetek.com]
- If you're uncertain, consult a licensed electrician or professional installer, especially for complex rooftop or multi‑building projects. [parts4star]
This is not only about performance; it is also about personal safety and liability.
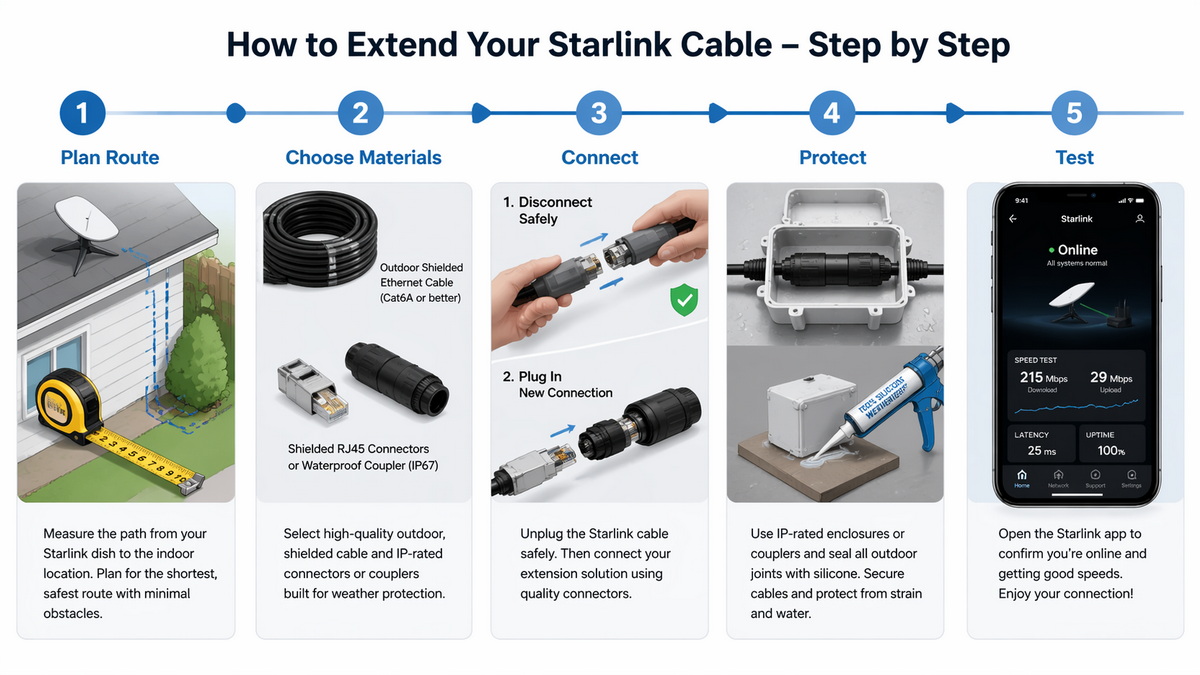
The following is a practical workflow we use for OEM and integration projects that rely on copper extensions. [dishytech]
1. Map the actual cable path, including all turns and obstacles, not just straight‑line distance. [linketric]
2. Add service slack (typically 10–15%) so you can re‑terminate or move devices later. [linketric]
3. Identify sources of potential EMI or mechanical risk along the route.
- Cable: Shielded, outdoor‑rated Cat6/Cat6A, full copper conductors, appropriate AWG. [spacetek.com]
- Connectors: Weatherproof shielded couplers or adapter boxes rated for outdoor use. [parts4star]
- Accessories: UV‑resistant clips, conduits, or trunking to protect and secure the cable. [parts4star]
When we manufacture custom extension assemblies (USB, HDMI, or specialized Starlink‑compatible cables), we match shielding structure, impedance, and jacket performance to the original system as closely as possible.
1. Power off the Starlink system completely to avoid electrical issues. [parts4star]
2. Disconnect the original cable from both the dish and the router or power unit. [parts4star]
3. Insert the extension segment, ensuring all connectors are fully seated and oriented correctly. [parts4star]
For spliced or custom‑terminated setups, this is where precise crimping and correct wire order (typically T568B) become critical. [youtube]
- Route the cable along planned paths, avoiding pinch points and sharp corners. [parts4star]
- Use clips, ties, or conduits to fix the cable in place and reduce strain. [parts4star]
- Seal outdoor junctions in IP‑rated boxes or with proper gaskets to keep out moisture. [linketric]
This step is essential for long‑term reliability, especially in harsh climates.
Before closing walls, burying conduits, or finalizing rooftop runs, I always run a complete test: [dishytech]
- Verify physical link and Starlink connectivity using the app.
- Check signal strength and speed, comparing them to pre‑extension baselines where possible. [dishytech]
- If available, run Ethernet tests (continuity, PoE voltage at the far end, long data transfer) to confirm stability. [dishytech]
If results are unstable, we adjust length, connectors, or routing before committing to a permanent installation.
From an expert perspective, I advise against extension in these situations: [starlink]
- You are already near or beyond recommended length limits and cannot upgrade cable quality or topology. [dishytech]
- You are not comfortable working with shielded connectors, PoE power, and outdoor waterproofing.
- Your environment is extremely harsh (heavy lightning, extreme temperatures) and you cannot ensure proper grounding and protection. [spacetek.com]
In such cases, it is often better to relocate the router closer to the dish and extend your internal network using more standard, easier‑to‑service cabling.
As a Chinese OEM specializing in USB, VGA, HDMI, DVI, SATA and custom network cables, we frequently design bespoke Starlink‑compatible cabling solutions for foreign brands, wholesalers, and integrators. [dtechelectronics]
Three lessons consistently stand out:
- Cable quality is non‑negotiable: full copper conductors, consistent shielding, and precise geometry dramatically improve stability on longer runs. [dtechelectronics]
- Connectors matter as much as the cable: poorly designed or unshielded couplers can ruin an otherwise excellent assembly. [dishytech]
- Pre‑testing at the factory—with real PoE loads and throughput tests—saves installers massive time on‑site and reduces failure rates.
If you are sourcing cables or extensions at scale, working directly with an experienced OEM helps you control both cost and reliability.
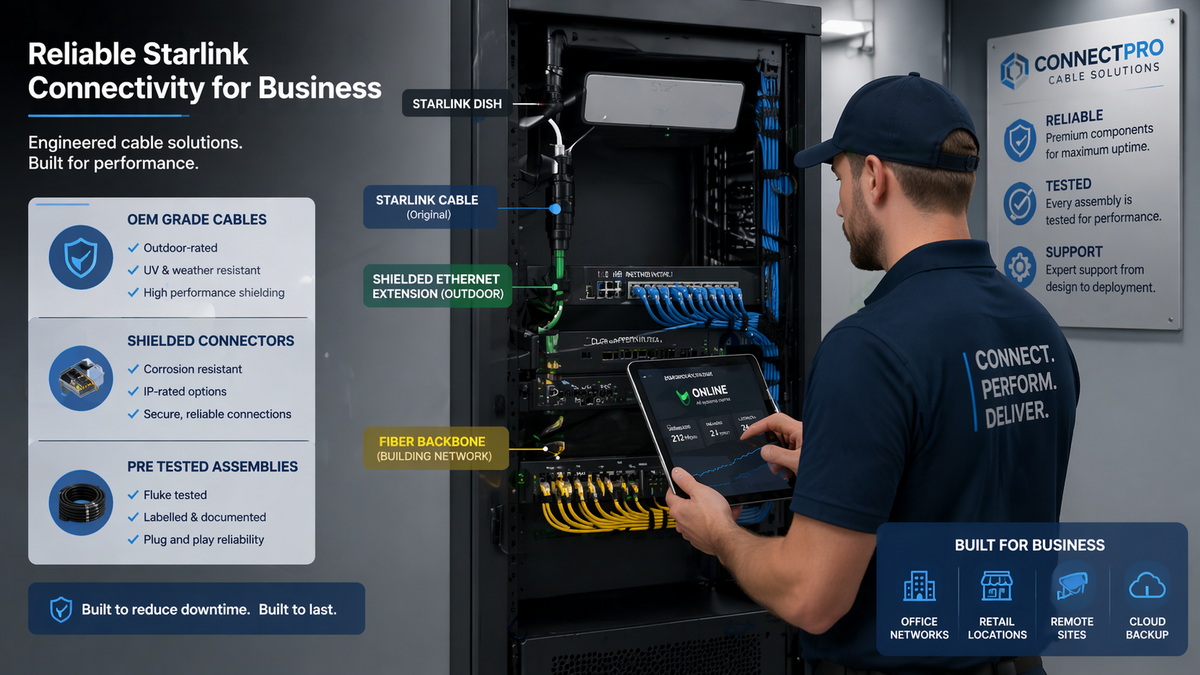
If you need reliable, OEM‑quality Starlink extension cables or custom assemblies tailored to your installation environment, working with a professional cable manufacturer can save you time, money, and frustration. [dtechelectronics]
Whether you are:
- A brand owner building your own Starlink‑compatible accessory line.
- A wholesaler serving RV, marine, or rural connectivity markets.
- A system integrator deploying Starlink for enterprises or government projects.
You can contact our engineering team to discuss optimized cable length, shielding, connector types, and environmental protection for your specific project requirements.
For typical home users, the safest method is to use an official Starlink extension cable where available, or a short, shielded outdoor Ethernet extension with a waterproof coupler, keeping total length within about 45 m. [starlink]
Starlink does not explicitly endorse DIY cable modification, and cutting the original cable or using unsupported accessories can affect warranty or support, so it is best to use approved components and avoid irreversible changes when possible. [starlink]
In many field deployments, staying within roughly 150 ft / 45 m of total copper cable between dish and router, while using high‑quality shielded cable and connectors, keeps performance within acceptable limits for most users. [dishytech]
From a network design standpoint, it is often better to keep the Starlink dish‑to‑router run short and robust, then extend your internal network using Ethernet or fiber, especially for multi‑building or long‑distance scenarios. [tiktok]
Yes, but only if you use direct‑burial or conduit‑protected, outdoor‑rated shielded cable, properly sealed junctions, and follow local codes for depth and separation from power lines to avoid damage and interference. [spacetek.com]
1. Premier Cable – "Can Starlink cables be extended?" (original article content).
2. Linketric – "How to Extend Your Starlink Cable Safely Without Losing Signal Quality."
<https://linketric.com/how-to-extend-your-starlink-cable-safely-without-losing-signal-quality/> [linketric]
3. Starlink Support – General installation and cabling guidance.
<https://www.starlink.com/support> [starlink]
4. Starlink Support (Spanish) – "¿Cuánto cable tengo y cómo lo instalo al interior?"
<https://www.starlink.com/pe/support/article/a9ce50c2-5b2e-46d8-2b21-90a7a1713f52> [starlink]
5. Parts4Star – "Starlink Gen 3 Cable Extension Installation Guide."
<https://parts4star.com/starlink-gen-3-cable-extension-2/> [parts4star]
6. DISHYtech – "Starlink Cable Lengths and Optional Extensions."
<https://www.dishytech.com/starlink-cable-lengths/> [dishytech]
7. Spacetek – "Detailed Guide to Starlink Satellite Cable."
<https://spacetek.com.au/blogs/news/detailed-guide-to-starlink-satellite-cable> [spacetek.com]
8. YouTube – "Starlink Cable Modification."
<https://www.youtube.com/watch?v=qeZyc0qXURE> [youtube]
9. Reddit – "Starlink Cable V2 Rectangular Dishy Modification."
<https://www.reddit.com/r/Starlink/comments/16vfz0m/starlink_cable_v2_rectangular_dishy_modification/> [reddit]
10. Dtech Electronics – "2025 Starlink Cable Buying Guide."
<https://www.dtechelectronics.com/2025-starlink-cable-buying-guide-comprehensive-analysis-from-model-to-installation_n147> [dtechelectronics]


